
How to crop
We truly appreciate your understanding and want to apologise for any hiccups you may have encountered with the image uploader not always automatically opening the circle crop! If you're having trouble with this feature, please see below easy step-by-step to help you get it sorted out quickly.
Thanks for your understanding!
Step 1

To start, click on the "Choose a Local File" button. This will open a files box where you can select the photos or designs you wish to upload from your device. Once you've selected all the files you want, simply click "Open" to upload them to the platform.
Step 2

Once you’ve uploaded all your files, please click on each file individually to crop it. Unfortunately, this process needs to be done one by one. It ensures you can customise each file to your liking.
Thank you for your patience!
Step 3

Once you have selected the file you want to crop, the image will open up. To activate the cropping tool, simply click on the circle below the image. This will allow you to adjust the crop as needed.
Step 4

Once the cropping tool is open, you can easily slide it around to center your photo or design just the way you like. Please note: that this crop will be exactly what gets printed, so make sure you’re absolutely satisfied with your selection, as we won’t be able to change the crop after you've uploaded it.
Step 6
Please ensure that you are completely satisfied with the crop, as this is the exact image that will be printed. Unfortunately, we won't be able to make any changes on our end after the upload. If you're not happy with the crop, simply select the circle below the image again to redo the crop before adding it. Your satisfaction is our priority!
Step 7

You will now need to crop each file by repeating the process above to ensure that all the images are formatted into circles. This step is important to make sure you are happy with how your images are centered (should you skip this step, your images may not be centered and they may not come out looking like what you wanted).
Thank you for your attention to detail!
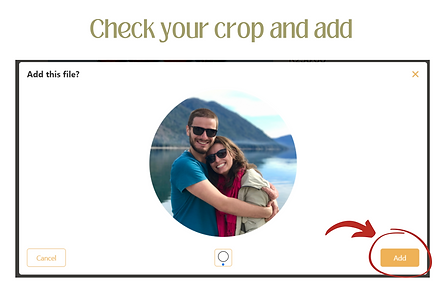
Step 8

Please ensure that each of your files are cropped into circles to achieve desired centering for your photo or design. It's important to review and confirm that you are satisfied with the centering, as we will not be able to make any changes after the upload. Then click 'add' at the bottom right corner.
Step 9

Your files have been successfully uploaded, and you'll notice that the images are now displayed in a circle. You can scroll through the images and indicate whether a photo or design should be duplicated. If you've added the maximum number of images allowed, there's no need to fill in the duplication options. However, if you've added fewer images and don't specify duplication, we will automatically duplicate from the first image on until the set is complete.
Thank you for your understanding and patience.